A year-round growing program for hibiscus, written by experienced Brisbane grower Jim Purdie.
These notes follow a 12-month program, starting in August as spring approaches. They are written for Brisbane conditions, so growers in cooler or inland areas may need to shift the timing a little (for example, waiting until the risk of frost has passed before pruning). There are also notes on yellow leaves, growing in pots and dealing with erinose mite.
| Month | At a glance |
|---|---|
| August | Apply dolomite to bring the soil pH up to 6.2–6.5 |
| September–October | Prune, mulch, and feed with high-nitrogen fertiliser for new growth |
| November–January | Good flowering; switch to high-potash fertiliser, water well, control beetles |
| February–March | Too hot for many flowers; watch watering and pick up fallen buds |
| April–June | The best blooms of the year; keep up the high-potash feeding |
| July | Coldest month; use liquid fertiliser on the leaves instead of solid fertiliser |
August: preparing the soil
In August I apply dolomite to my ground to raise the pH to 6.2–6.5, the level at which hibiscus grow best. If the ground is too acid, the elements in the fertiliser are locked up in the soil, the plant can’t take them up properly, and growth suffers. I use dolomite because it contains magnesium as well as calcium.
I apply it in August because it takes about six weeks to take full effect, and it’s best not to apply fertiliser at the same time as dolomite, which you’ll need to do in spring.
September: pruning and spring feeding
This is the month we start to prune in Brisbane. In colder areas, make sure any danger of frost has passed first.
- Notice which plants are tall, strong growers and which are slow, low growers. Tall growers can be cut back by about half; slow growers usually by about one third.
- Cut about half an inch (1 cm) above an outward-pointing eye, on a slant away from the eye.
- Clean out any old wood and open up the middle of the bush by removing branches that fill the centre, and any spindly branches that won’t produce good growing limbs.
As the weather warms up, the plants start to send out new shoots. This is the time to apply a fertiliser high in nitrogen to promote new growth. Keep applying it until the plant looks like it’s getting ready to flower, usually towards November, then switch to a fertiliser higher in potash than nitrogen to promote blooms. If you keep using high-nitrogen fertiliser you’ll get lovely lush green bushes but no flowers. You need the potash for blooms, and to add size and colour to them.
Jim’s spring fertiliser mix
In September I mix up a fertiliser for the beds, using a 2-litre ice-cream container as a measure:
- 2 containers of blood and bone
- 2 containers of superphosphate
- 1 container of sulphate of potash
- ½ a container of magnesium sulphate (Epsom salts)
- ¼ of a container of sulphate of iron
Mix it well and apply a good handful around each established bush. When the plants are ready to flower I change to a fertiliser with more potash than nitrogen.
If you have only a few bushes, use a high-nitrogen fertiliser and get yourself some sulphate of potash. Give each established bush a good handful of the high-nitrogen fertiliser at the start of the month, and a dessertspoon of potash in the middle of the month to promote flowering. For a small plant put in only a month or so ago, use just a teaspoon of each until it’s established.
Always water the ground before applying fertiliser, and again afterwards to wash it in, so you don’t burn the roots.
Mulch
I always apply a good covering of mulch after I prune. It keeps the weeds at bay and conserves moisture, the roots love to grow just under it in the cool, moist ground, and it gradually breaks down into good humus that the worms love. Sugar cane mulch, composted grass and leaves, pine bark fines or tea-tree mulch all work. Use some kind of covering to keep the ground cool and stop the surface drying out. Hibiscus have surface roots, and if the surface keeps drying out you lose those roots and the plant suffers.
November to January: flowering and beetle control
The weather here is usually very good for flowering until the first couple of weeks of January, so keep applying fertiliser each month and keep up the water. Watch for insect attack and deal with any bugs whenever you see them.
This is when I start to see the little black beetle. My trap is white 2-litre ice-cream containers with a couple of inches of water and a squirt of cheap dishwashing detergent, placed around the garden in the sun where the beetles can see them. White seems to attract them best. I have about 24 of these around the yard. The beetles think it’s a big white flower, land in the water and drown. The detergent is essential: it breaks the surface tension so they sink, otherwise they swim across and crawl out.
Pick up fallen buds and spent flowers every evening. The beetles breed in them on the ground, and if you leave them you’ll have a factory producing dozens more. Put the buds and blooms in a plastic bag in the rubbish bin.
February and March: the hot months
From late January through February and March we don’t get many flowers. It’s too hot, the plants drop their buds, and insects breed in the hot, humid weather, causing more bud drop. Bud drop happens whenever a plant is under stress; it’s one way they show they’re not happy.
- Watch the watering. Plants use a lot of water in hot weather through evaporation from the leaves, and a lack of water is another cause of bud drop.
- Water in the cool of the evening, and on really hot days it pays to hose the plants in the middle of the day as well.
- Pick up fallen buds every day.
- Keep up the high-potash fertiliser.
April to June: the best blooms
These are the best months for blooms here. Keep up the high-potash fertiliser at least monthly, and enjoy the fruits of your labours.
July: winter feeding
July and August are our coldest months. I don’t use solid fertiliser on the ground then, because the sap flow slows in the cold and the plant doesn’t take up nourishment from the soil. Instead I apply a liquid fertiliser to the leaves, which gives the plants all they need.
I apply it with a fertigator. I mix the solution in a 50-litre bin, and the fertigator connects into my hose about halfway along. When I turn on the hose it draws fertiliser from the bin at about 10 to 1, so I water and fertilise at the same time. I always do this before lunch so the plants dry off before the cold night air comes in; otherwise the leaves can be burnt by the cold, or fungus sets in.
And then we’re back to the start of the year, and more dolomite.
Yellow leaves
People often ring me worried about yellow leaves. This happens periodically throughout the year and is natural for hibiscus. It can follow rain, when the plant puts on a burst of new growth; it can follow fertilising; and spraying for insects can sometimes cause it too. When a new leaf starts to grow, all the energy goes into it, the old leaf gets no nourishment and begins to die, and going yellow is part of that. The new leaf soon takes its place and the plant looks nice and green again.
It also happens at the start of winter, when the sap flow slows and there isn’t enough food for the older leaves, leaving only the green leaves at the top. As soon as you prune, new growth appears again.
So don’t worry about some yellow leaves. You may have a problem if the whole plant goes yellow and looks very sick. That can mean root rot, and a plant in that condition can be hard to save.
Growing in pots
Hibiscus in pots need a very open potting mix for good drainage, because they don’t like a wet mix around the roots. My own mix is:
- 50% composted pine bark fines
- 30% compost
- 10% garden soil
- 10% coarse river sand
- plus some dolomite to bring the pH to 6.2–6.5, and some blood and bone
- Watering: pots dry out very quickly in summer and get very hot in the sun, so I water every day. Even in winter, wind can dry pots out quickly.
- Feeding: I don’t give pots the same solid fertiliser as the garden, as it can burn the roots. I use a 9-month controlled-release fertiliser in the mix, plus soluble fertiliser on the leaves. Fertiliser washes out of pots quickly, so feed at least weekly.
- Potting up: start small plants in a 6-inch (15 cm) pot, then move up gradually to 8 inch (20 cm) and so on.
- Refreshing: once a plant is in its final pot, each spring scratch away as much mix from the top as you can (even some top roots) and refill with fresh potting mix.
- Every two years: take the plant out, shake off as much old mix as you can, trim some roots, prune the top in proportion, and repot in the same size pot with fresh mix.
I grow potted plants in full sun.
Erinose mite
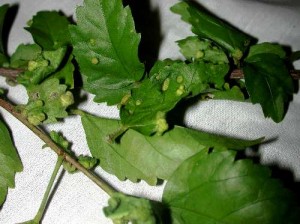
Erinose mite is microscopic, so you’d need a powerful microscope to see it. It floats in on the wind, and when it lands on a plant it burrows into the leaf and causes lumpy growths like those in the picture.
When you find the lumps, take off the leaf, or the whole branch if it’s affected, put it in a plastic bag and into the rubbish bin. If you don’t remove it while it’s only a small patch, it spreads through the sap system to the branch tip and gradually down through the whole bush, and once it’s in the main sap system it’s very hard to get rid of.
I find that if the plant is well fed and watered it can outgrow the problem, as long as you remove the affected parts before the mite gets a good hold. Sprays are available, but I don’t bother: removing infected growth early works for me, and since more mites can float in on the wind at any time, you’d be spraying constantly. If you do choose to spray, check for a currently registered product and follow the label.
These culture notes were written by Jim Purdie for Brisbane growing conditions, and are reproduced with permission via Wally Morgan’s The World of Hibiscus. Lightly edited for this website.
See also: Growing Hibiscus · Propagation & Grafting · Societies & Registration